


Table of Contents
ToggleTired of spending every weekend weeding and watering? Rock and mulch landscaping is the practical solution for homeowners who want curb appeal without the constant upkeep. Unlike traditional grass-heavy yards, a front yard designed with rocks and mulch requires minimal maintenance while looking polished year-round. Whether you’re a complete beginner or someone who’s tackled a few DIY projects, this guide walks through everything from material selection to installation and long-term care. The best part? You don’t need expensive equipment or professional experience to pull it off.
Key Takeaways
- Low maintenance front yard landscaping with rocks and mulch eliminates weekly mowing and watering while suppressing weeds naturally and retaining soil moisture year-round.
- Decorative rocks like pea gravel, river rock, and crushed granite each offer unique benefits—choose based on your climate, traffic patterns, and visual style preferences.
- Proper installation with landscape fabric, edging, and 2–3 inches of mulch depth is critical to preventing weeds and ensuring the landscape lasts 5+ years with minimal upkeep.
- Wood-based mulch requires annual spring top-ups but enriches soil over time, while decorative rocks provide long-term stability without decomposition.
- Initial investment in rock and mulch landscaping typically pays for itself within 2–3 years through savings on water bills, mower maintenance, and yard chemicals.
- Seasonal maintenance takes just 2–3 hours quarterly—occasional weeding, raking, and mulch refresh—compared to the constant demands of traditional lawn care.
Why Rocks and Mulch Are Game-Changers for Low Maintenance Yards
Rock and mulch landscapes eliminate the endless cycle of mowing, watering, and chemical treatments. They suppress weeds naturally, retain soil moisture, and regulate temperature around plants, all without you lifting a finger weekly.
Unlike lawn grass, which demands regular cutting, feeding, and pest management, rocks and mulch create a stable growing environment. Mulch breaks down over time, enriching soil with organic matter, while decorative rock remains inert and consistent. Together, they form a barrier that makes it nearly impossible for weeds to establish.
Another huge advantage is visual flexibility. Rocks and mulch look good in any season, don’t turn brown during drought stress, and work with any home style, modern, cottage, contemporary, or rustic. Once installed, your maintenance shifts from weekly chores to occasional top-ups and very basic weeding. That’s the real appeal for busy homeowners looking to reclaim their weekends.
Moneywise, the upfront cost is higher than plain grass, but the long-term savings on water bills, mower maintenance, and yard chemicals add up quickly. Most homeowners see their initial investment recover within 2–3 years through lower water and equipment costs.
Choosing the Right Rock and Mulch Materials
Types of Decorative Rocks for Front Yards
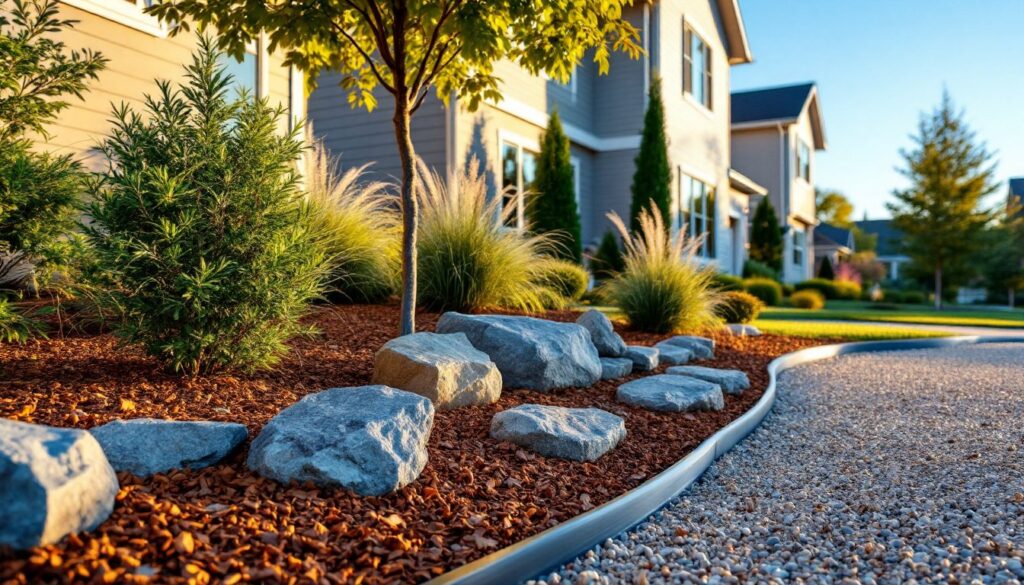
Decorative rock comes in several main types, each with different visual and functional benefits. Pea gravel is small, smooth, and rounded, typically ½ to ¾ inches, making it comfortable to walk on and perfect for pathways or planting beds. It’s affordable and comes in neutral tans and grays.
River rock is slightly larger (1 to 2 inches) and has a polished appearance that catches light nicely. It’s durable, doesn’t compact easily, and works well as a focal point or border element. Landscaping Gravel Types: Discover the Best Choices for Stunning Outdoor Spaces provides deeper detail on selecting gravel based on climate and design.
Crushed granite or crushed stone offers a more angular, textured look and locks together slightly, making it resistant to shifting. It’s excellent for high-traffic areas and pairs well with mulch beds.
Slate chips and decorative stone deliver a premium appearance but come at a higher price. They work best as accent elements rather than full coverage.
Consider your climate when choosing. In wet regions, larger rocks like river rock drain better than fine gravel, which can become muddy or compacted.
Selecting the Best Mulch Varieties
Wood-based mulch (shredded hardwood, cedar, or cypress) is the most common choice. It breaks down over 18–24 months, feeding soil with organic matter, but requires annual top-ups. Cedar and cypress are naturally aromatic and resist insects, though they cost more.
Bark mulch is heavier and breaks down slower than shredded wood, making it a good option if you want fewer replacements. It’s also effective for weed suppression.
Compost-based mulch enriches soil quickly but decomposes even faster, sometimes in 6–12 months. Reserve it for vegetable or flower beds rather than foundation plantings.
Rubber mulch (recycled tire material) lasts 10+ years and requires almost zero maintenance, but it doesn’t enrich soil and can get hot in direct sun. Use it sparingly or avoid it near seating areas.
Depth matters: apply mulch 2–3 inches deep. Too shallow and weeds break through: too thick and it traps moisture against plant stems, inviting rot. Keep mulch 4–6 inches away from tree trunks and shrub bases.
Essential Design Ideas and Layout Strategies
A successful rock and mulch landscape starts with thoughtful layout. Begin by defining beds and pathways, use a garden hose or spray paint to sketch out shapes before you dig anything. Curved lines feel more natural than rigid rectangles: aim for gentle S-curves or flowing borders.
Layer your materials for visual interest. Plant ornamental grasses, evergreen shrubs, or small trees, then surround them with mulch. Edge the mulch bed with larger rocks or a defined border to prevent spilling onto walkways. Stone for Landscaping: Transform Your Yard explains how rock placement guides the eye and creates focal points.
Consider your home’s architecture. Modern homes suit clean lines and monochromatic rock palettes. Cottage or rustic styles benefit from varied textures, mix pea gravel, river rock, and bark mulch in adjacent beds.
For budget-conscious projects, Landscaping on a Budget: 10 Creative Tips shows how strategic material selection and phased installation reduce upfront costs. Install high-visibility areas (front entrance, driveway) first, then expand to side yards.
Don’t forget transitions. If one side of your yard has lawn and the other rock, use a defined edge (metal or plastic edging, or a low border) to separate them cleanly. This prevents grass creep and looks intentional.
Step-by-Step Installation Process
Before you begin: Wear safety glasses, gloves, and a dust mask when handling bags of rock or mulch. Have a wheelbarrow, shovel, and rake ready. Estimate yardage: multiply bed length × width × desired depth (in feet), then divide by 27 to get cubic yards.
-
Prepare the ground. Remove existing grass, weeds, and debris. Use a spade to slice and lift turf, or spray a desiccant herbicide 7–10 days before installation if the area is large. Level the soil and fill any low spots so water drains evenly away from structures.
-
Install edging (optional but recommended). Metal or plastic landscape edging holds mulch and rock in place, preventing creep into lawns. Stake it 6 inches deep along bed perimeters. Edging costs $0.50–$2 per linear foot but saves hours of maintenance.
-
Lay landscape fabric. Unroll heavy-duty landscape fabric (4–6 ounces) over the prepared bed. Overlap seams by 6 inches and secure with landscape pins every 2–3 feet. The fabric blocks weeds while allowing water infiltration. Don’t skip this step, it’s the difference between a one-season project and a five-year solution.
-
Spread mulch first. Pour mulch over the fabric and rake it to a 2–3 inch depth. Mulch won’t shift as much if laid before rock, and it creates a stable base.
-
Add decorative rock. Spread your chosen rock (pea gravel, river rock, or crushed granite) over and around the mulch in a 2–3 inch layer. If using rocks as borders or focal points, place larger pieces individually. Step back frequently to assess balance.
-
Water lightly. A gentle spray settles materials and compacts fabric, preventing wrinkles. This also activates mulch and prepares soil for planting.
-
Plant (if desired). Cut X-shaped holes in the fabric, set plants, and backfill with mulch around the stem base. Perennials, ornamental grasses, and low-maintenance shrubs thrive in this setup.
Maintenance Tips to Keep Your Landscape Looking Fresh
The beauty of rock and mulch is that maintenance is minimal compared to lawn care. But, a little upkeep keeps everything looking polished.
Mulch refresh. Wood-based mulch breaks down and darkens over time, especially in hot sun or wet climates. Top-dress beds annually with 1–2 inches of fresh mulch in spring. This maintains depth, improves aesthetics, and replaces decomposed material. Budget roughly $50–$100 per 100 square feet for annual mulch top-ups, depending on material grade.
Weed management. Even with landscape fabric, occasional weeds poke through seams or from windblown seeds. Pull them by hand when young, the fabric makes extraction easy. Spot-treat stubborn perennials with a targeted herbicide (follow label instructions carefully). Never use broad-spectrum weedkillers on established beds: they harm desirable plants.
Rock raking. Pea gravel and crushed stone can shift after heavy rain or foot traffic. Rake them back into place 2–3 times a year, especially before guests arrive. River rock requires less attention since it naturally locks in place.
Edging touch-ups. Metal edging may settle or shift: reset stakes if needed. Plastic edging can crack in cold climates, inspect annually and replace damaged sections.
Pest and disease checks. Rock and mulch landscapes actually reduce pest habitat compared to dense lawn. But, monitor mulch near tree trunks for fungal growth or termite activity. If you spot issues, thin the mulch layer or switch to a slower-decomposing variety like cypress bark.
Seasonal prep. In fall, clear leaves from beds so they don’t smother mulch and trap moisture. In spring, refresh mulch colors and remove any compacted or matted sections. In winter, avoid piling snow and ice directly on shrubs: clear rock away from sensitive plantings if heavy snow is expected.
With these routines, your rock and mulch landscape stays attractive with just 2–3 hours of work quarterly, far less than mowing season demands.